Step by step: Page 106
Hello! I’ll be utilizing these blog posts to explain my process when it comes to In Memoriam pages, or other kinds of art! I am by no means limiting myself to these topics, I’m just dipping my toes into the Blogging Sphere by talking about stuff I’m passionate about!
I’ll be talking about my process on Page 106. I’ve already uploaded these images on my twitter and tumblr, but now I wont be limited by character limits and what not – so I can go in depth about my thought process!
Step 1: Thumbnail

I unfortunately misplaced the original sketch for page 106 but all pages basically start out this way. I usually sketch out about 5 pages when I’m working on thumbnails. When I’m feeling pretty good about the scene, I can sometimes sketch up to 10 pages! However, I like to limit myself to 5 pages because thats when I can keep memory of what the panels represent since my thumbnails can…be pretty messy.
I don’t work off a script, as many comic writers do. I primarily think of the visuals first, then attach speech after. Usually I have a pretty good idea of what I want to be said on the page, so I write out the speech next to the thumbnails if space allows. If the sketches are particularly messy, I add small details to remind myself what to draw in the panel in the next step.
Step 2: Cleanup


I feel like I’m weird in that I use two stages of cleanup. I put down basic stick figure sketches with the emotion/gestures I want the final version to have. This is extremely basic and I often only take a minute at most doing this part. Then I get started on cleaning up that sketch so I know how to line said image and make sure it’s anatomically correct.
“Why dont you just make sure your first sketch is clean?”
because I make bad decisions!
This is usually where I make the frames and fill in the gutters. I have a fondness for filled in gutters, I can’t place why. Though whenever I get around to making a print version, my wallet will NOT be happy.
Step 3: Lineart

Lineart is a fickle beast. Sometimes I can finish 4 pages worth of lineart in a day, other times it can take two weeks just to line ONE page. This often depends on a variety of factors such as how I’m feeling physically and mentally, or if I even want to work on the page. As much as I like the story, some pages are a pain!
Technical aspects, I use photoshop’s basic hard round brush. Ive tried a variety of brushes in the beginning, but none of them really had my back like the hard round. I would Die for the hard round brush.
Step 4: Flats

Pretty self explanatory. I have their colors in Photoshop’s swatch window and just pick from there. If a character isn’t going to be reoccuring, I usually just eyedrop their colors from previous pages so I don’t end up clogging up my colors.
As for filling it in, I use the magic wand tool to select the negative space and expand the selection by a pixel or two. Usually this works since there are no gaps in the lineart (which is why the hard round has been the best brush I found for my usage)
Step 5: Filling in the Background

I usually alternate between step 6 and step 7. Sometimes I do step 7 first, usually when I’m drawing pages out in batches. Though for the most part, I prefer doing step 6 first to get it out of the way.
I sketch out a basic background, drawing a grid on the ground if need be. I know a lot of people prefer rendering their backgrounds in stuff like Blender/Maya/Sketchup/etc. but I personally feel like the amount of time I would put into making sure a 3d environment has every indication of the environment I want, I could’ve drawn twice the amount. No judgement! 3d just does not work for me.
I usually render the background a little bit more, giving it a painterly aspect. This is more so the characters can be separated from the background to be the focus, but not entirely remove them from the world.
Step 7: Shading

Back to the characters. This is where I apply shading.
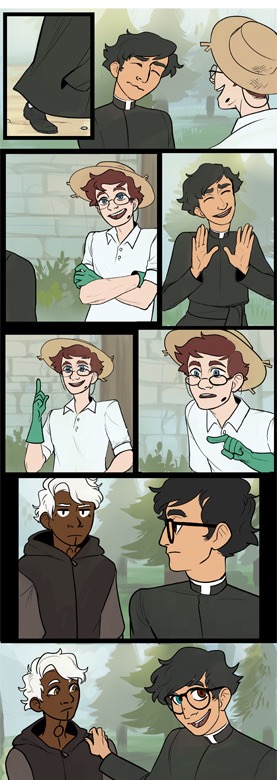
I keep the light source in mind as I use the lasso tool to select where I’ll be applying the shadows. Sometimes I break the rules and change the lighting to evoke a certain mood, such as the 2nd to last panel. I wanted Preston to seem more ominous of a presence than usual and hint at something. The case could also be made that panel can be from Graham’s perspective – the beauty of art! Multiple interpretations!
Step 8: Finishing Touches

As the header states, this is where I put the finishing touches! Action lines, shadows of the characters in backgrounds to ground them in the environment, glasses, anything I forgot, etc. There really is no limit. This is also where I put speech bubbles, add panels to make the page flow more cohesive, and whatever else. After all is said and done, I size the page down by 33% and queue it for upload!
That’s it! Hopefully that provides some insight into my thought process for anyone who was curious.
Conclusion
If any reader has any questions or want me to go in depth about any topic (provided I know about it!) I’d be happy to discuss it in further entries. Feel free to message me over on these sites
http://cheasegary.tumblr.com
@heterodont on twitter
or email me at kingeeart@gmail.com
Thank you so much for reading!
Discussion ¬